Set Up .
Materials: a mousetrap, four 1 inch eye hooks, a plastic chopstick, floral wire, two pens, eight regular water bottle caps, two thinner water bottle caps, four old computer discs, one balloon, braid nylon mason string, hot glue, a drill, a pin with a small head, a ruler, a pencil, a screwdriver, a pliers, a scissors, duct tape and matches.
Procedure:
1.) On the two shorter sides of the mouse trap use a ruler to measure 5/8 of a centimeter (or 1/4 of an inch) from each of the corners. Using a pencil, mark each of these points with a dot.
2.) Take a drill and place it on each of these dots drilling four holes into the mousetrap.
3.) Twist an eye hook into each of the holes you made with the drill. Make sure to twist them all the way in so that the collar of the eye hooks is touching the mousetrap.

4.) Remove "the cheese" by using a screwdriver to pry it off.
5.) Attach the plastic chopstick to the metal bar of the mousetrap (the part that snaps) by wrapping the floral wire around it several times. Make sure these wrappings are tight and secure the chopstick by winding the ends of the wire together and folding them down against it. Use hot glue to further secure the chopstick to the metal bar.
5.) Attach the plastic chopstick to the metal bar of the mousetrap (the part that snaps) by wrapping the floral wire around it several times. Make sure these wrappings are tight and secure the chopstick by winding the ends of the wire together and folding them down against it. Use hot glue to further secure the chopstick to the metal bar.

6.) Take the two pens and remove their caps, tips, ink, and ends so that they are just hollow tubes.
7.) Take the 8 regular sized water bottle caps and use a ruler to find their centers. Use a pencil to mark each of these points. Again using the drill, drill holes through these water bottle caps at their center points.
8.) Slide one of these water bottle caps, flat side first, through the pen and secure it by hot gluing around the pen where it goes through the hole in the cap. Then slide one of the computer discs onto the pen. Hot glue the edge of the water bottle cap to the disc. It is important to make sure you go ALL the way around the edge of the water bottle cap with hot glue so the wheel doesn't wobble! Next, slide another water bottle cap, flat side second, through the pen. Again, secure the water bottle cap by hot gluing it to the pen where it goes through the hole in the cap and to the disc by going around the edge of the bottle cap. Repeat this process for the second wheel on the back axle and for one of the wheels on the front axle.

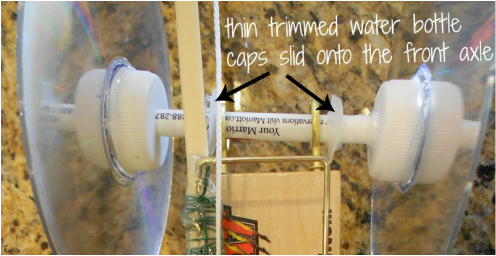
9.) Take the two thinner bottle caps and use a ruler to find their centers, marking each with a dot. Use the drill to drill holes through the caps at these points. Next, using a scissors, cut the rims off both of them. Then slide them onto the pen that is being used as the front axle. Attach the final wheel by the process mentioned in step 8.
10.) Push the pen axles up into the eye hooks and use a pliers to slightly close them around the pens so that they don't fall out. DON'T CLOSE THEM VERY MUCH BECAUSE THIS WILL CAUSE THE AXLES NOT TO TURN OR EXTREME FRICTION!
10.) Push the pen axles up into the eye hooks and use a pliers to slightly close them around the pens so that they don't fall out. DON'T CLOSE THEM VERY MUCH BECAUSE THIS WILL CAUSE THE AXLES NOT TO TURN OR EXTREME FRICTION!

10.) Take a balloon and cut the very top and very bottom of it off using a scissors. Cut the remaining piece of balloon in two strips. Stretch one of these strips around the edge of one of the back wheels and the other of these strips around the edge of the second back wheel.


11.) On the front axle, place the thin trimmed bottle caps on either sides of the eye hooks. Make a circle of hot glue around the outer edge of them so they don't slide out of place. Also, make a ring of hot glue around the outer edges of the eye hooks on the back axle as well.
12.) Take the pin with the head and puncture it into the back pen axle in between the two eye hooks.
12.) Take the pin with the head and puncture it into the back pen axle in between the two eye hooks.


13.) Take braided nylon mason string and wrap it around the top of the chopstick several times, tying the ends in a knot. Secure this string by duct taping it to the chopstick. Unravel the string so that it goes just past the back axle a few centimeters and cut it. Tie the end of the string in a small loop and burn the end of it using the matches to keep it from fraying.
14.) THE CAR IS COMPLETE! :)
14.) THE CAR IS COMPLETE! :)

worked on by alex thephachanh and shannon brennan :)
